Contrary to popular belief, midday sun isn’t a limitation but a powerful artistic tool for creating dramatic, high-impact landscape photography.
- Harsh light carves out geometric patterns and reveals textures that are invisible during the soft light of sunrise or sunset.
- With the right techniques—like using telephoto lenses and specific filters—you can control contrast and sculpt dramatic scenes from what others see as poor conditions.
Recommendation: Instead of waiting for the golden hour, learn to embrace high noon by treating shadows as subjects and seeking out graphic compositions.
For any landscape photographer, the frustration is universal. You’ve been taught to worship the golden hour, that fleeting period of soft, warm light just after sunrise and before sunset. You’ve been told that high noon, with its harsh overhead sun and deep, unflattering shadows, is a creative dead zone—a time to pack up your gear and wait. This dogma leaves you with only a few precious hours of “good light,” turning vast, beautiful days into long periods of missed opportunity.
The common advice is often reactive: find shade, convert to black and white, or just give up. But what if this core belief is flawed? What if the problem isn’t the light itself, but our approach to it? The midday sun doesn’t just illuminate; it sculpts. It reveals raw texture, carves out bold geometric lines, and saturates colors with an intensity that softer light cannot match. It offers a different visual language—one of drama, power, and graphic clarity.
This guide challenges the golden hour myth. We will explore the idea that midday light is not an obstacle to be avoided, but an opportunity to be mastered. By shifting your perspective, you can learn to paint with high contrast and compose with shadows. We will delve into the technical skills, planning strategies, and ethical considerations that transform the harshest part of the day into your most creative. It’s time to stop waiting for the light and start commanding it, no matter the time on your watch.
This article will guide you through the essential techniques and responsibilities of a modern landscape photographer. From the ethics of sharing locations to the technical mastery of lenses and filters, you will find a complete roadmap to capturing nature’s beauty responsibly and artistically, even under the most challenging light.
Summary: The Golden Hour Myth: Why You Should Shoot Landscapes at High Noon
- Geotagging on Instagram: Is It Ruining Hidden Spots?
- Wide Angle or Telephoto: Which Captures Scale Better?
- Google Earth Scouting: Finding Compositions Before You Travel?
- Drone Laws in National Parks: What You Risk by Flying?
- Polarizers and ND Filters: Are They Essential for Waterfalls?
- The Ethics of photographing Locals: When to Put the Camera Down?
- Cloud Reading: Predicting Storms Before They Hit the Mountain?
- How to Spot Greenwashing in ‘Eco-Friendly’ Hotels?
Geotagging on Instagram: Is It Ruining Hidden Spots?
As you develop the skill to capture stunning images at any time of day, the urge to share your discoveries grows. Yet, the very tool used for sharing—social media—carries a significant ethical weight. Geotagging, the practice of embedding location data into your posts, has become a fierce debate in the photography community. On one hand, it’s a way to share beauty and inspire others. On the other, it can lead to overwhelming visitor traffic that fragile ecosystems are not equipped to handle.
The impact can be staggering. In some cases, once-secluded locations have seen visitor numbers explode almost overnight after going viral. For instance, landscape photographer Matt Payne documented how one location, Ice Lake Basin in Colorado, went from 10-20 visitors per week to over 1,200 per day in a single year due to social media exposure. This phenomenon, often called “Instagram-fueled overtourism,” can lead to soil erosion, wildlife disruption, and an accumulation of waste, fundamentally altering the character of a place.
However, the connection isn’t always direct. An Oregon State University study found that while iconic and picturesque landscapes are susceptible, increased Instagram posts were not associated with increased visitation in most state parks. The takeaway is one of mindful consideration. Before you tag, consider the location’s resilience. Is there infrastructure to support more visitors? Is it a sensitive ecological area? A responsible photographer weighs the desire for recognition against the duty of conservation. Often, being vague—tagging a region instead of a specific trail—is the most ethical choice, allowing you to share the beauty without pinpointing the vulnerability.
Wide Angle or Telephoto: Which Captures Scale Better?
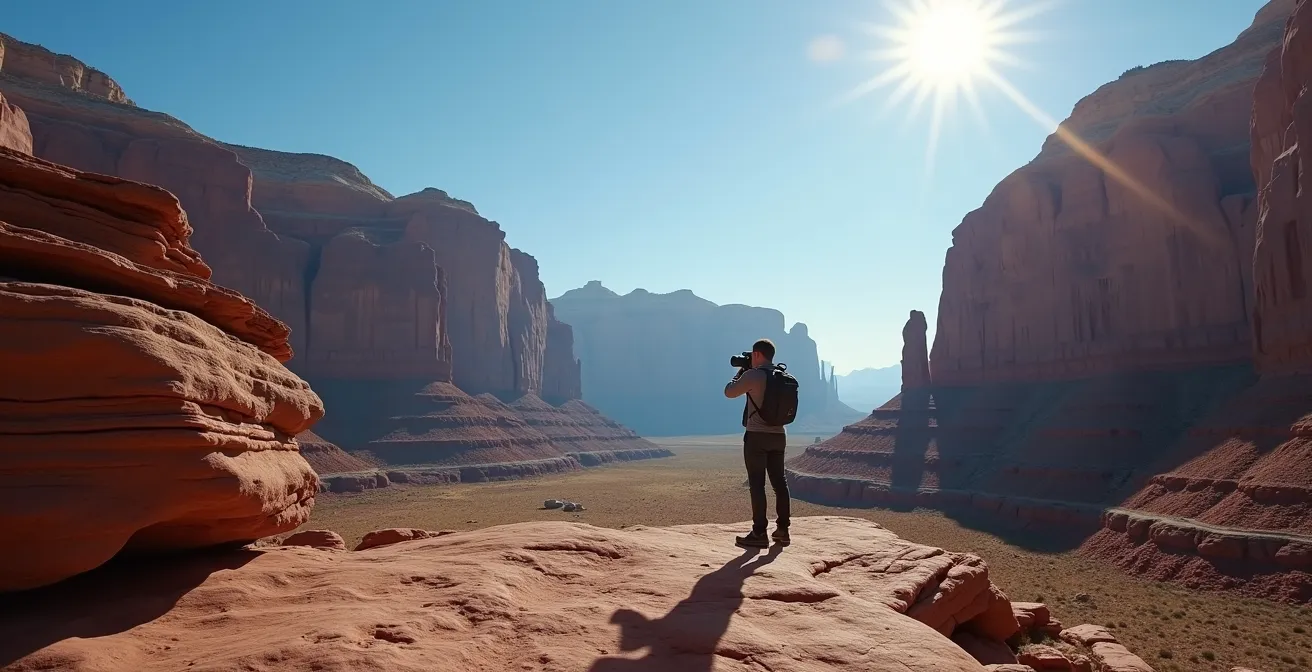
Mastering midday light is fundamentally an exercise in composition, and your lens choice is your primary compositional tool. The debate between wide-angle and telephoto lenses isn’t about which is “better,” but what story you want to tell. A wide-angle lens (typically 14-35mm) is the classic choice for landscape photography, used to convey vastness and immerse the viewer in the scene. At noon, it can be used to turn strong shadows into powerful leading lines, guiding the eye through the frame. But it also risks capturing a flat, washed-out sky, a common frustration in harsh light.
Here is where the counter-intuitive power of the telephoto lens (70-200mm and beyond) comes into play. Instead of fighting the harsh light across a wide scene, a telephoto allows you to isolate and conquer it. It compresses distance, stacking distant mountains and ridges into abstract, graphic layers. This compositional compression is magnificent at midday, as the high sun creates distinct bands of light and shadow that form geometric patterns. You are no longer capturing a landscape; you are hunting for shapes and textures carved by the sun. As the Loaded Landscapes Photography Guide notes, “The bright sun can sometimes bring out fascinating details that wouldn’t otherwise be seen.” This is the essence of midday telephoto work: finding the “details” in the drama.

This image demonstrates how a telephoto lens isolates the interplay of light and shadow, turning a complex mountain range into a minimalist study of texture and form. For a starting point in these conditions, consider the “Sunny 16 rule,” which suggests setting your aperture to f/16 with a shutter speed and ISO that are reciprocals (e.g., ISO 100 and 1/100s). This gives you a baseline exposure to then creatively adjust for your specific scene, whether you’re emphasizing the expansive view of a wide-angle or the textural revelation of a telephoto.
Google Earth Scouting: Finding Compositions Before You Travel?
The most compelling midday photographs are rarely happy accidents; they are the result of meticulous planning. While golden hour shots can be forgiving, high-contrast noon light demands that you know exactly where to be and which direction to face. This is where digital scouting tools like Google Earth Pro and dedicated apps like PhotoPills or The Photographer’s Ephemeris become indispensable. They allow you to travel to a location virtually and predict the sun’s behavior before you ever pack your camera bag.
The real power of these tools for midday photography lies in shadow prediction. Using Google Earth’s 3D view and its time-of-day slider, you can see precisely where shadows will fall at 12:00 PM on any given day of the year. This transforms your planning from guesswork into a strategic hunt for compositions. You can identify deep canyons that will remain in shade, creating a natural softbox effect. You can locate tall, north-facing cliffs that will be evenly lit without direct overhead sun. This pre-visualization allows you to build a shot list of promising locations, maximizing your time on the ground and ensuring you arrive with a clear artistic vision.
This scouting process is not just about finding shade; it’s about finding drama. You can identify ridges that will cast long, geometric shadows across a valley floor or sea stacks that will be perfectly silhouetted against the bright water. By exploring a location at its “worst” time of day from the comfort of your home, you can uncover its hidden potential and prepare outstanding compositions that harness, rather than hide from, the power of the midday sun. This proactive approach turns frustration into anticipation.
Drone Laws in National Parks: What You Risk by Flying?
Once you’ve mastered capturing dramatic landscapes from the ground, the allure of an aerial perspective is powerful. Drones offer a god’s-eye view that can reveal patterns and scale impossible to see otherwise, especially when high-contrast midday light is carving up the landscape. However, this creative freedom comes with serious legal and ethical responsibilities, particularly in protected areas. The most important rule is unequivocal: launching, landing, or operating an unmanned aircraft within the boundaries of any U.S. National Park is strictly prohibited without a special permit, which is rarely granted for hobbyist photography.
The penalties for violating this rule are not trivial. They are designed to protect both wildlife from disturbance and other visitors from noise and safety hazards. Flyers can face severe consequences, including fines of up to $5,000, up to six months in prison, and the confiscation of their equipment. It is crucial to understand that these regulations differ from those in other public lands, a point of frequent confusion. While National Parks have a near-total ban, National Forests are generally more permissive, allowing drone flights as long as they follow FAA guidelines and stay out of designated wilderness areas or active wildfire zones.
| Aspect | National Parks | National Forests |
|---|---|---|
| General Policy | Prohibited since 2014 to protect wildlife and visitor safety | Generally allowed following FAA regulations |
| Penalties | Up to 6 months prison and $5,000 fine | FAA standard penalties apply |
| Exceptions | Special use authorization required for research/emergency | Restricted in wilderness areas and during wildfires |
| Equipment Risk | Confiscation of drone and media | Standard FAA enforcement |
The key for the responsible drone pilot is diligent research. Before flying anywhere near a protected area, use apps like B4UFLY or AirMap to check for restrictions. Often, you can legally fly from adjacent National Forest or Bureau of Land Management (BLM) land to capture images of a National Park from outside its boundaries. This requires careful planning to respect the letter of the law while still achieving your creative vision.
Polarizers and ND Filters: Are They Essential for Waterfalls?
If lenses are for composition, filters are for controlling light itself. For the midday photographer, they are not just accessories; they are essential tools for taming the sun’s harshness and unlocking creative effects. Two filters are particularly crucial: the Circular Polarizer (CPL) and the Neutral Density (ND) filter. They are especially transformative when photographing water, like waterfalls, oceans, or lakes, under the bright noon sun.
A Circular Polarizer is your primary weapon against glare. It works by cutting out polarized light, which is most prevalent when the sun is at a 90-degree angle to your lens. At midday, this means it can dramatically reduce the white, blown-out reflections on the surface of water and wet foliage, revealing the deep colors and textures underneath. By simply rotating the filter, you can dial in the effect, making a stream’s rocky bed visible or boosting the saturation in a bright blue sky. It’s the single most impactful filter for enhancing color and clarity in harsh light.
A Neutral Density (ND) filter, on the other hand, is like sunglasses for your lens. It reduces the total amount of light entering the camera, allowing you to use much slower shutter speeds than would otherwise be possible on a bright day. As Digital Photography School explains, “You can shoot long exposures even on a bright sunny day. The trick is add a round neutral density filter.” This is the secret to creating that silky, ethereal look in waterfalls or smoothing the motion of clouds. A 10-stop or 15-stop ND filter can turn a half-second exposure into a multi-minute one, blurring the movement of water into a dreamlike mist and even digitally erasing moving crowds from a busy scene.
Your Action Plan: Auditing Your Midday Light Technique
- Lens Choice: Review your last 10 midday shots. Did you default to a wide-angle? Plan your next outing to shoot exclusively with a telephoto to hunt for compressed, abstract patterns.
- Shadow Scouting: Pick a local park in Google Earth. Use the time slider to find three compositions that only work at noon because of the shape and direction of the shadows.
- Filter Practice: On a sunny day, find a water source. Practice rotating your polarizer to see its maximum effect on reflections and sky color. Note the angle to the sun.
- Exposure Control: Use a 10-stop ND filter to take a 30-second exposure of a waterfall or moving clouds at noon. Compare the result with a standard, fast-shutter-speed shot.
- Compositional Shift: Intentionally compose a shot where a shadow is the main subject, not just a byproduct. Use it as a leading line or a frame.
The Ethics of photographing Locals: When to Put the Camera Down?
Landscape photography often intersects with travel and street photography, raising a different set of ethical questions: how do we responsibly photograph people and their cultures? The challenge is amplified at midday, where bright, direct light can feel intrusive and confrontational when pointed at a person. The answer lies in shifting your focus from overt portraits to environmental storytelling, using the very qualities of harsh light as an ethical tool.
One of the most powerful techniques is to use deep midday shadows to your advantage. Instead of seeing them as a problem, view them as a means of preserving anonymity and dignity. A strong shadow can obscure a subject’s face, turning the photograph from an identifying portrait into a universal depiction of an activity, a mood, or a craft. You can focus on the details that tell a story: the weathered hands of a craftsman, the tools of a trade illuminated by a sliver of bright light, or the silhouette of a vendor against a sun-drenched wall. This approach respects privacy while still capturing the human element within the landscape.
Building rapport is paramount. Often, the best time for interaction is during a local siesta or break, when life moves at a slower pace. Engage in conversation without your camera raised. Ask for permission not as a transaction, but as part of a genuine human connection. If a portrait is desired, harsh light can be managed. A large diffuser can be used to soften the sun, creating a beautiful, gentle light even at high noon. The ultimate ethical guideline is empathy. If a situation feels uncomfortable, or if your presence is altering the moment in a negative way, that is the time to put the camera down. The best photograph is never worth sacrificing someone’s dignity or peace.
Cloud Reading: Predicting Storms Before They Hit the Mountain?
While clear, blue skies at noon present one type of challenge, the arrival of clouds introduces a dynamic and often more exciting variable. Clouds are nature’s light modifiers, and learning to read them is as crucial a skill as knowing how to use your camera. They can transform a flat, high-contrast scene into one filled with dramatic, shifting light and mood. This directly challenges the idea that you should just wait for a cloudy day; instead, you should learn to work with the clouds you have.
Different cloud types have vastly different effects on midday light. High, wispy cirrus clouds do little to diffuse the sun but can add texture and interest to an otherwise empty sky. A sky full of puffy, well-defined cumulus clouds is often the ideal scenario for midday shooting. They act as moving gobos, casting sweeping shadows that race across the landscape, creating a dynamic light show that highlights different parts of the scene from moment to moment. Your job becomes one of patience and timing, waiting for the light to paint the exact feature you want to emphasize. Conversely, a solid, thick layer of stratus clouds creates a giant, overcast softbox, diffusing the sun and producing soft, even light perfect for intimate forest scenes or waterfall photography.
The ability to read clouds also has a critical safety component, especially in mountainous or remote areas. Dark, flat-bottomed cumulonimbus clouds are a clear signal of an approaching storm. Learning to spot them from a distance gives you time to seek shelter or change your plans. But even these dramatic clouds offer photographic opportunity. The moments just before a storm, when the light becomes eerie and the clouds are dark and textured, can produce some of the most powerful images. In fact, many photographers have found that the best light can appear straight around noon, especially during these fleeting moments of atmospheric drama.
Key Takeaways
- Embrace the Contrast: Stop seeing harsh light as a flaw. Use it to create bold, graphic, and dramatic images that stand apart from soft golden-hour shots.
- Shadows Are Your Subject: Treat deep shadows not as areas to be recovered, but as powerful compositional elements. Use them as leading lines, negative space, or frames.
- Technology Unlocks Potential: Master your tools. Telephoto lenses isolate patterns, filters control glare and motion, and scouting apps let you plan for dramatic light before you leave home.
How to Spot Greenwashing in ‘Eco-Friendly’ Hotels?
The ethos of a modern landscape photographer extends beyond the moment of capture. It encompasses a holistic respect for the environments we photograph, which includes the choices we make as travelers. As your passion takes you to more remote and beautiful places, your footprint matters. This has led to a rise in “eco-tourism,” but with it comes the deceptive practice of “greenwashing,” where businesses spend more time and money marketing their eco-credentials than on minimizing their actual environmental impact.
Spotting genuine sustainability requires looking beyond vague marketing terms like “eco-friendly” or “green.” A truly responsible hotel or tour operator will be transparent and specific. Look for recognized, third-party certifications like B Corp, Green Globe, or those from the Global Sustainable Tourism Council (GSTC). These certifications require rigorous audits and are a much stronger signal than a hotel’s self-proclaimed green status. Be wary of a focus on superficial gestures, like reusing towels, while ignoring larger impacts like energy sources, water consumption, and waste management.
A sustainable lodging will be able to provide concrete details. Do they source their food locally? Do they treat their wastewater? Do they use renewable energy? How do they contribute to the local community and conservation efforts? As photographer Matt Payne observes about the photography world, “the idea that geotagging is a problem might not seem intuitive.” The same is true for greenwashing; what seems eco-friendly on the surface may not be. The responsible photographer applies the same critical eye they use for composition to their travel choices, ensuring their pursuit of beauty doesn’t inadvertently harm the very places they cherish.
Now that you’re equipped with the techniques and mindset to conquer midday light, the next step is to put it into practice. Grab your camera the next time the sun is high in the sky, and instead of waiting for it to set, start hunting for the geometric beauty and dramatic textures that everyone else is missing.