Most paddling accidents aren’t caused by a single dramatic mistake, but by a chain of small, overlooked failures that begin long before the boat even touches the water.
- Your safety system’s integrity is tested on the highway, not just in the rapids. A poorly secured kayak is the first link to break.
- Reading the water is a non-negotiable skill, but understanding how your gear (PFD, paddle) and your body interact with it is equally critical.
Recommendation: Shift from a reactive ‘what-if’ approach to a proactive ‘what-is’ assessment of your gear, environment, and personal limits on every single trip.
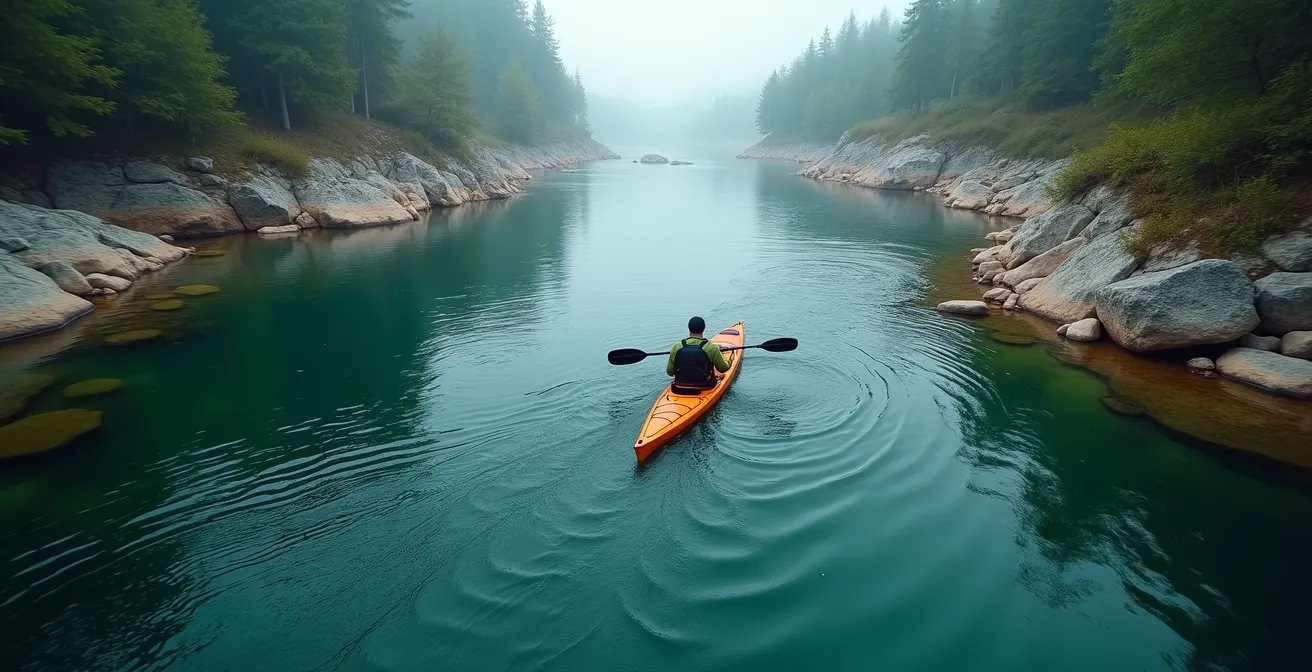
For the flatwater paddler ready to take on moving water, the allure of currents and dynamic environments is strong. But with new challenges come new risks. Many paddlers believe safety is a checklist of rules to memorize: wear a PFD, learn to roll, check the weather. While these are not wrong, they are dangerously incomplete. They treat safety as a series of isolated actions rather than a comprehensive system.
This approach misses the fundamental truth that a capsize or a dangerous situation is rarely the result of one single failure. It is the final, catastrophic outcome of a chain of smaller, unaddressed issues. A loose strap on the roof rack, a poorly fitted life jacket, a misinterpretation of a subtle wave pattern—these are the weak links that lead to disaster. This is where a professional mindset fundamentally differs from an amateur one.
The true key to safety is not just reacting to danger, but proactively managing risk from the moment you decide to go paddling. It’s about developing an instructor’s mentality of constant assessment and system integrity. This guide is built on that philosophy. We will deconstruct the entire process, from securing your boat at home to understanding your impact on the ecosystem, to build a holistic safety framework.
We’ll examine the critical points of failure that are often overlooked, providing the ‘why’ behind the ‘what’. By adopting this professional mindset, you will not only learn how to read river currents to avoid capsizing but will transform your entire approach to safety on the water, making every trip more competent, confident, and secure.
This guide breaks down eight critical components of a professional paddler’s safety system. Each section addresses a common point of failure, providing the expert perspective needed to build a truly resilient and proactive approach to risk management on the water.
Summary: A Guide to Total Water Safety
- Roof Rack Fails: How to Tie Down a Kayak Without Losing It?
- PFD Fit: Why Your Life Jacket Rides Up When You Swim?
- The Self-Rescue Roll: Is It Mandatory for Solo Paddling?
- Wind against Tide: The Conditions That Create Dangerous Chop?
- Low Angle vs High Angle: Which Paddle Style Saves Energy?
- Rip Currents: The Visual Signs That Save Lives?
- Does Your Travel Insurance Cover Helicopter Rescue?
- Why Reef-Safe Sunscreen Is Non-Negotiable in 2024?
Roof Rack Fails: How to Tie Down a Kayak Without Losing It?
Your safety system begins the moment you load your kayak, not when you launch it. As an instructor, I see catastrophic failures that happen at 65 mph on the highway far too often. A kayak becoming a missile on the road is a complete failure of the first link in your safety chain. Relying on cheap bungee cords or simply “good enough” knots is a mark of an amateur. A professional understands that transport is part of the mission and requires a dedicated, redundant system.
The core principle is eliminating movement. The boat should become one with your vehicle. This requires high-quality cam straps—never ratchet straps, which can easily crack a plastic or composite hull. The goal is a snug fit, not a crushed one. Furthermore, bow and stern lines are not optional decorations; they are essential for redundancy and to counteract the powerful aerodynamic lift that wants to rip the kayak from your roof at speed. A common mistake is failing to twist the straps, which leads to a loud, vibrating hum caused by harmonic resonance—a sign of uncontrolled energy in your system.
Follow a professional, systematic method every single time you load your boat. Consistency builds habits that prevent complacency. This isn’t just about protecting your gear; it’s about protecting the lives of everyone else on the road.
- Position the kayak centered on the crossbars with its weight evenly distributed.
- Loop cam straps under the crossbars and over the kayak hull, ensuring they are flat.
- Secure and tighten the cam straps until snug, then perform the ‘shake test’ by firmly shaking the kayak side-to-side. The boat and car should move as one unit.
- Secure bow and stern lines to your vehicle’s dedicated tow points or recovery loops, not to plastic bumpers.
- Add one or two twists to the flat sections of your straps to stop them from vibrating in the wind.
- Perform a final tug test on the boat itself, not just the straps, to confirm the entire system is solid.
PFD Fit: Why Your Life Jacket Rides Up When You Swim?
A Personal Flotation Device (PFD) is the single most critical piece of safety equipment you own. Yet, a staggering number of paddlers treat it as a token gesture, wearing one that is improperly fitted. The data is sobering: U.S. Coast Guard statistics reveal that 87% of those who drowned in recreational boating fatalities were not wearing a life jacket. But simply wearing one isn’t enough; it must function correctly. If your PFD rides up over your face when you’re in the water, it has failed. It becomes a dangerous obstruction to your breathing and vision when you need it most.
This failure is almost always due to a poor fit. The PFD is designed to grip your torso, lifting you from your core. When the straps are too loose, the buoyancy of the jacket lifts the jacket itself, not you. It slips up around your head, effectively doing nothing to keep your airway clear. A professional paddler treats their PFD like a climbing harness—it must be snug and secure before being loaded. This means adjusting all straps, from the shoulders to the waist and sides, for a tight but comfortable fit.
The definitive way to confirm a proper fit is the ‘lift test’. This non-negotiable step simulates the forces your PFD will experience in the water. It must be performed every time you put on your jacket.
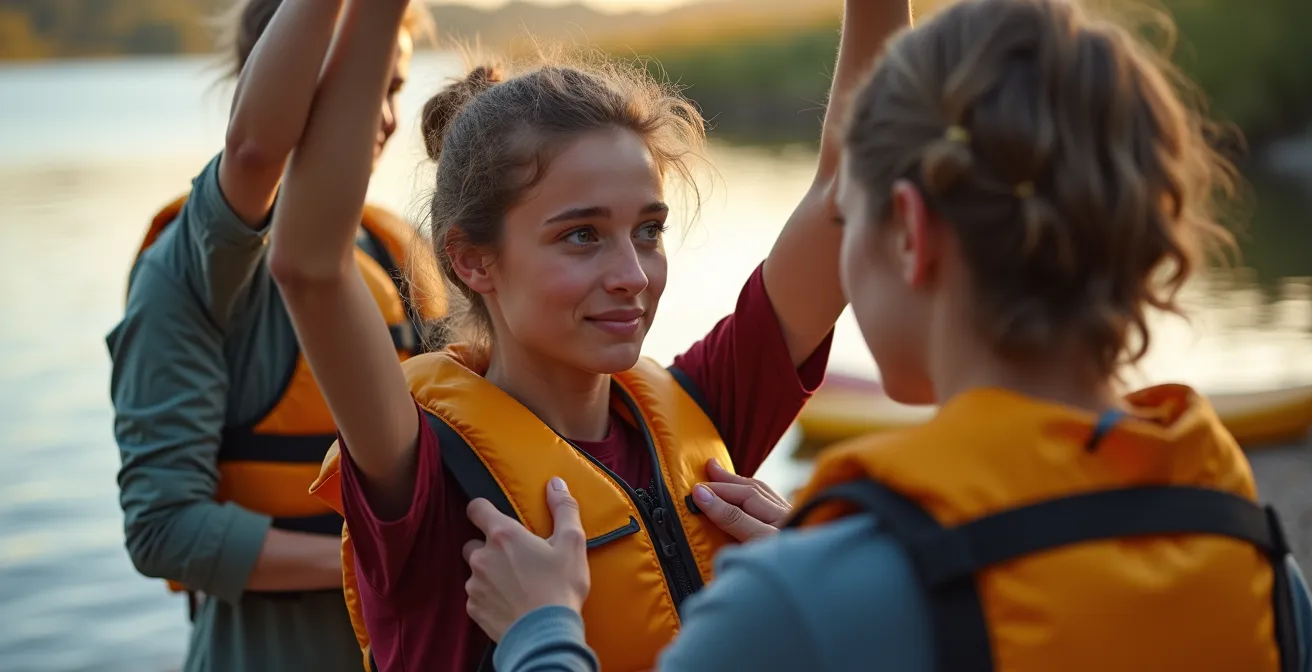
As demonstrated, have a partner pull up firmly on the shoulder straps while you raise your arms. The PFD should not move past your chin or ears. If it does, it is too loose or the wrong size, and it will fail you in a real-world scenario. Your PFD is not just a jacket; it is a life-support system that demands a perfect fit.
- Put on the PFD and fasten all buckles.
- Systematically tighten all adjustment straps—starting with the waist and moving to the side and shoulder straps—for a snug, secure fit.
- Raise your arms straight above your head as if signaling a touchdown.
- Have a partner stand behind you and attempt to pull the PFD straight up by the shoulder straps.
- The critical check: The PFD must not ride up higher than your ears or mouth. If it moves up and covers your face, it is too loose or the wrong size and is unsafe for use.
The Self-Rescue Roll: Is It Mandatory for Solo Paddling?
The kayak roll is often mythologized as the ultimate self-rescue skill. While a reliable “combat roll” is an incredibly powerful tool, especially in cold or rough water, the dogmatic belief that it’s the *only* acceptable self-rescue is a dangerous oversimplification. For a solo paddler, the more important question is not “Can you roll?” but rather, “What is the safest and most reliable recovery method for the current conditions?” A professional mindset prioritizes a successful outcome over a stylish technique.
In certain situations, attempting a roll can be the wrong choice. In very shallow, rocky water, a roll can lead to a serious head or shoulder injury. In this scenario, a controlled “wet exit”—tucking forward to protect your head and swimming clear of the boat—is the superior safety decision. Similarly, for a paddler on a calm, warm lake, a paddle float re-entry is an extremely reliable and less physically demanding technique. The roll is not obsolete, but it is a tool for a specific job: rapid recovery in conditions where prolonged immersion is dangerous (e.g., cold water, strong currents, or surf zones).
The decision of which technique to use is a dynamic risk assessment. A paddler who only knows how to roll is just as limited as one who doesn’t know at all. The truly competent solo paddler has a toolbox of self-rescue techniques and knows when to deploy each one. Your primary goal is to get out of the water and regain control of your craft efficiently and safely.
The following table, based on common rescue scenarios, outlines a decision-making framework. As an analysis of various self-rescue methods shows, the right choice is always dictated by the environment.
| Water Condition | Primary Technique | Backup Method | Success Rate |
|---|---|---|---|
| Calm, Warm Water | Paddle Float Re-entry | Swim to Shore | High |
| Cold Water <50°F | Combat Roll | Immediate Wet Exit | Critical Speed Required |
| Rough/Windy | Re-enter and Roll | T-Rescue if Available | Moderate |
| Shallow Rocky | Controlled Wet Exit | Swim Clear First | Avoid Roll Attempts |
Wind against Tide: The Conditions That Create Dangerous Chop?
Many paddlers who are comfortable on flat water are caught off guard by the violent and chaotic conditions created by wind opposing a current. This phenomenon, known as “wind-against-tide” or “wind-over-current,” is one of the most underestimated dangers in coastal and large river paddling. It can transform a placid body of water into a field of steep, breaking waves—often called “chop” or “clapotis”—in a very short time. Understanding this interaction is a cornerstone of environmental literacy.
The physics are straightforward but dramatic. When wind blows in the same direction as the current, it lengthens the waves and smooths their surface. But when the wind blows against the flow of water, the current effectively “compresses” the waves. This shortens the wave period (the distance between crests) and dramatically increases their height and steepness. The effect is not minor; maritime physics demonstrates that a wind wave will nearly double when encountering a 5-knot opposing current. This creates a “washing machine” effect that is extremely difficult to paddle through and can easily lead to a capsize.
A professional paddler actively anticipates these conditions by checking not only the wind forecast but also the tidal charts or river flow data. The most dangerous periods are often during peak tidal flow or high river discharge when a strong opposing wind is forecast. Coastal paddling experts consistently identify this ‘wind-against-tide’ chop as a primary cause of incidents, requiring constant monitoring of marine forecasts. Ignoring the interplay between wind and current is a critical failure in pre-trip planning and risk assessment.
Low Angle vs High Angle: Which Paddle Style Saves Energy?
Your paddle is your engine, and how you use it determines your efficiency, power, and endurance. The debate between “low angle” and “high angle” paddling is not about which is better, but which is the right tool for the job. A common misconception among novice paddlers is that one style fits all situations. A professional, however, understands that adapting their paddle stroke to the conditions and their objective is essential for both performance and energy conservation.
The low angle style is characterized by a more horizontal paddle shaft during the stroke. The top hand generally doesn’t rise above the shoulder. This technique primarily uses smaller, more durable muscle groups in the shoulders and is the marathon runner’s choice. It’s exceptionally efficient for covering long distances on flat or calm water, as found in recreational touring. It is a relaxed, sustainable stroke designed for all-day paddling.
In contrast, the high angle style involves a much more vertical paddle shaft. The top hand rises to eye or forehead level, engaging the large, powerful muscles of the core and back. This is the sprinter’s stroke. It delivers immense power and allows for rapid acceleration and maneuverability. It’s the preferred technique for whitewater, surfing, or battling a strong headwind, where short bursts of intense power are needed. Using this style for long-distance touring will lead to rapid fatigue if your core is not well-conditioned.
The most competent paddler is not a purist; they are a hybrid. They start a tour with a relaxed low angle stroke and seamlessly transition to a powerful high angle stroke to punch through an eddy line or battle a sudden headwind, returning to low angle once the challenge has passed. The choice is a strategic one based on energy management.
This biomechanical comparison breaks down the fundamental differences, highlighting how each style is optimized for a specific purpose.
| Aspect | Low Angle Style | High Angle Style |
|---|---|---|
| Primary Muscles | Smaller shoulder muscles (long lever advantage) | Core and back muscles |
| Best Use Case | Endurance, flat water touring | Power, maneuverability, currents |
| Kayak Type | Wide, stable recreational | Narrow sea/whitewater kayaks |
| Energy Efficiency | Superior for long distances | Better for short bursts |
| Stroke Rate | 45-50 strokes/minute | 60-75 strokes/minute |
Rip Currents: The Visual Signs That Save Lives?
While often associated with ocean swimmers, rip currents are a serious threat to kayakers, especially in surf zones or near river mouths. A rip is a powerful, narrow channel of water moving away from the shore. Being caught in one can be terrifying, as it can pull a paddler out into deeper or rougher water with surprising speed. The key to safety is not fighting the rip, but having the environmental literacy to identify and avoid it in the first place. Relying on brute force to paddle against a rip is a losing battle that quickly drains energy and leads to panic.
Instead of panicking, a trained observer can spot the tell-tale signs of a rip current from the shore or on the water. Rips are a break in the natural pattern of the waves. They are your ‘road out’ if you need one, but an enemy if you’re caught unaware. Safety experts emphasize that understanding local rip patterns is far better than becoming another statistic, especially on days when small waves can be deceptive, as long-period swells can generate surprisingly strong outward flows.
These visual cues are often subtle, but a professional paddler actively scans the water for them before launching and while paddling. Look for anomalies. Water that is a different color—often darker, indicating deeper water, or murky with sand being pulled offshore—is a major red flag. A gap in the line of breaking waves, or an area of choppy, churning water surrounded by calmer seas, is another classic sign. Your goal is to build a mental map of the water’s behavior before you become a part of it.
Your Action Plan: Spotting Rip Currents
- Scan for channels of darker, discolored water, which often indicate deeper channels where water is flowing seaward.
- Look for lines of foam, seaweed, or other debris moving steadily out to sea, perpendicular to the shore.
- Identify localized areas of choppy or churning water, which may be surrounded by much calmer water on either side.
- Notice any distinct gaps in the pattern of incoming breaking waves; this is often where the return flow is concentrated.
- Observe where waves are not breaking as uniformly or as large as in adjacent areas.
- Pay attention to any changes in water color that could signal sand and sediment being pulled away from the shore.
Does Your Travel Insurance Cover Helicopter Rescue?
As you venture into more remote or challenging waters, your personal safety system must expand to include a plan for worst-case scenarios. A common and dangerous assumption is that your standard travel insurance will cover you if you need a rescue. The hard truth is that most policies have significant exclusions for “hazardous activities,” and a helicopter rescue is almost never a simple, covered event. A professional mindset involves reading the fine print and understanding that rescue and insurance are two separate, though related, systems.
Insurers often use a very narrow definition of “medically necessary.” Being stranded on a remote beach due to a lost paddle or impassable conditions, even if dangerous, may not qualify if you are not physically injured. The policy is there to cover medical emergencies, not logistical inconveniences, however dire. Furthermore, activities like whitewater kayaking are frequently listed as explicit exclusions. To be covered, you almost always need to purchase a specific “adventure sports” rider or a dedicated policy from a specialist provider.
Equally important is having a means to initiate a rescue. Services like Garmin inReach or SPOT, which use satellite communication, allow you to send an SOS from anywhere. However, these services coordinate the rescue; they do not pay for it. The bill for a helicopter or a rescue boat will come later, which is where insurance (if you have the right coverage) comes in. The most critical step, as emphasized in countless safety protocols, is the float plan. Sharing your route, timeline, and participant information with a reliable contact on shore can save lives by enabling a coordinated response, especially when paddling in remote areas that may fall outside standard insurance coverage zones. Ultimately, you are responsible for your own rescue plan.
Key Takeaways
- True safety is a proactive mindset, not a reactive checklist. Your risk management begins at home, not at the water’s edge.
- Your gear is a system. A failure in one component, like a poorly fitted PFD or a loose roof strap, compromises the entire system’s integrity.
- Environmental literacy—the ability to read wind, water, and currents—is more critical than any single physical skill. Anticipate danger before it happens.
Why Reef-Safe Sunscreen Is Non-Negotiable in 2024?
A professional paddler’s mindset extends beyond personal safety to encompass responsibility for the environments we enjoy. The sunscreen you wear might seem like a minor detail, but its chemical components have a devastating and well-documented impact on aquatic ecosystems. This is not just an issue for tropical coral reefs; it’s a matter of water quality everywhere. For the modern paddler, choosing a “reef-safe” sunscreen is a non-negotiable part of our ethos.
The term “reef-safe” is often used as a marketing buzzword, so you must learn to read the ingredients list. The primary culprits are chemicals like Oxybenzone and Octinoxate, which are known to cause coral bleaching, damage coral DNA, and disrupt marine life development. The solution is to use mineral-based sunscreens. These products use physical blockers—specifically non-nano Zinc Oxide or Titanium Dioxide—that sit on top of the skin rather than being absorbed. The “non-nano” specification is crucial; it means the particles are too large to be ingested by coral polyps.
This issue is not confined to the ocean. The same chemicals that harm coral are also endocrine disruptors that damage freshwater ecosystems. As research confirms that reef-harming chemicals are also endocrine disruptors damaging freshwater ecosystems, it becomes clear that every paddler on every body of water has a role to play. Protecting your skin from UV damage is critical, but it cannot come at the cost of the very environments that bring us so much joy and challenge. Making the switch is a simple, powerful way to uphold your responsibility as a steward of our waterways.
Your journey to becoming a safer, more competent paddler starts not on the water, but with the professional mindset you cultivate on land. Use this guide as a framework to audit your equipment, knowledge, and decision-making process before every trip. True safety is a continuous practice, not a destination.
Frequently Asked Questions About Kayaking Safety and Insurance
What’s the difference between travel insurance and device subscription services?
Travel insurance reimburses costs after the fact, while services like Garmin inReach or SPOT coordinate immediate rescue response. Most paddlers need both for complete coverage.
What does ‘medically necessary’ mean for insurers?
Insurers define this narrowly – only life-threatening emergencies qualify, not situations where you’re stranded but uninjured, even in dangerous conditions.
Are whitewater kayaking activities covered?
Most standard policies explicitly exclude ‘hazardous activities’ including whitewater kayaking. You must add specific adventure sports riders for coverage.